Thursday, July 24, 2014

54. JsonStore

The JsonStore is used to store data to permanent memory so it can be read later.


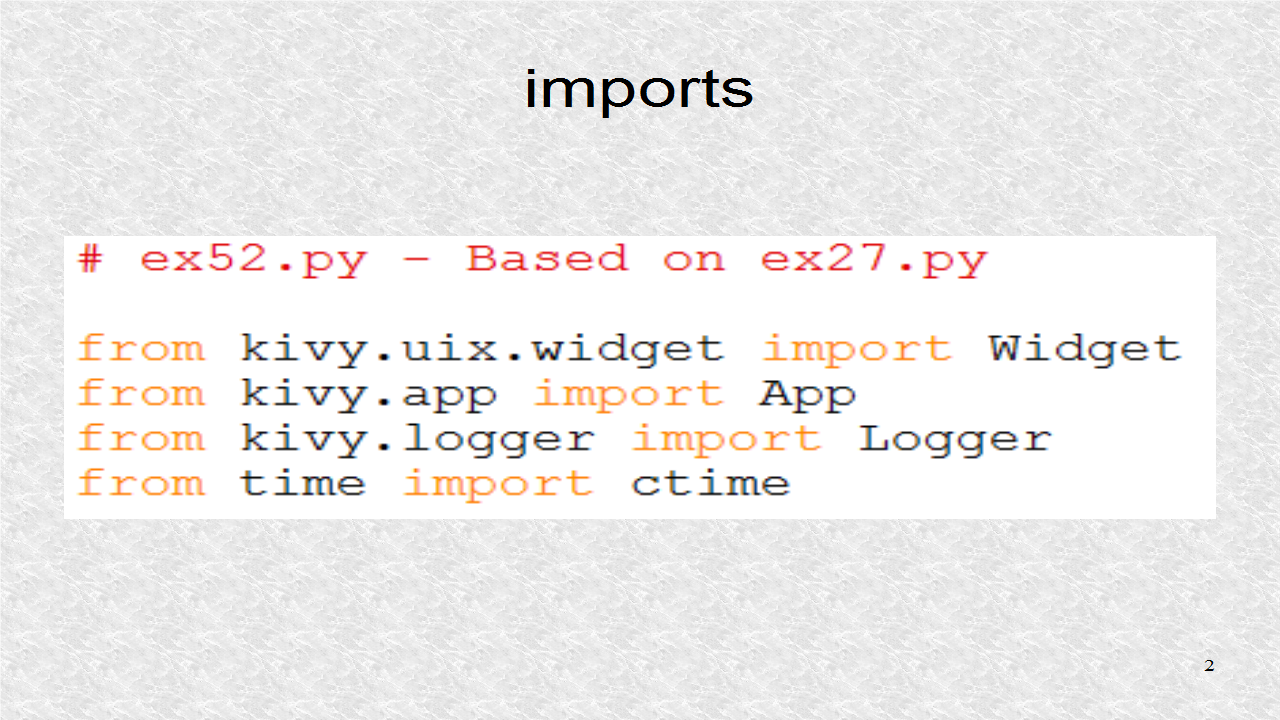
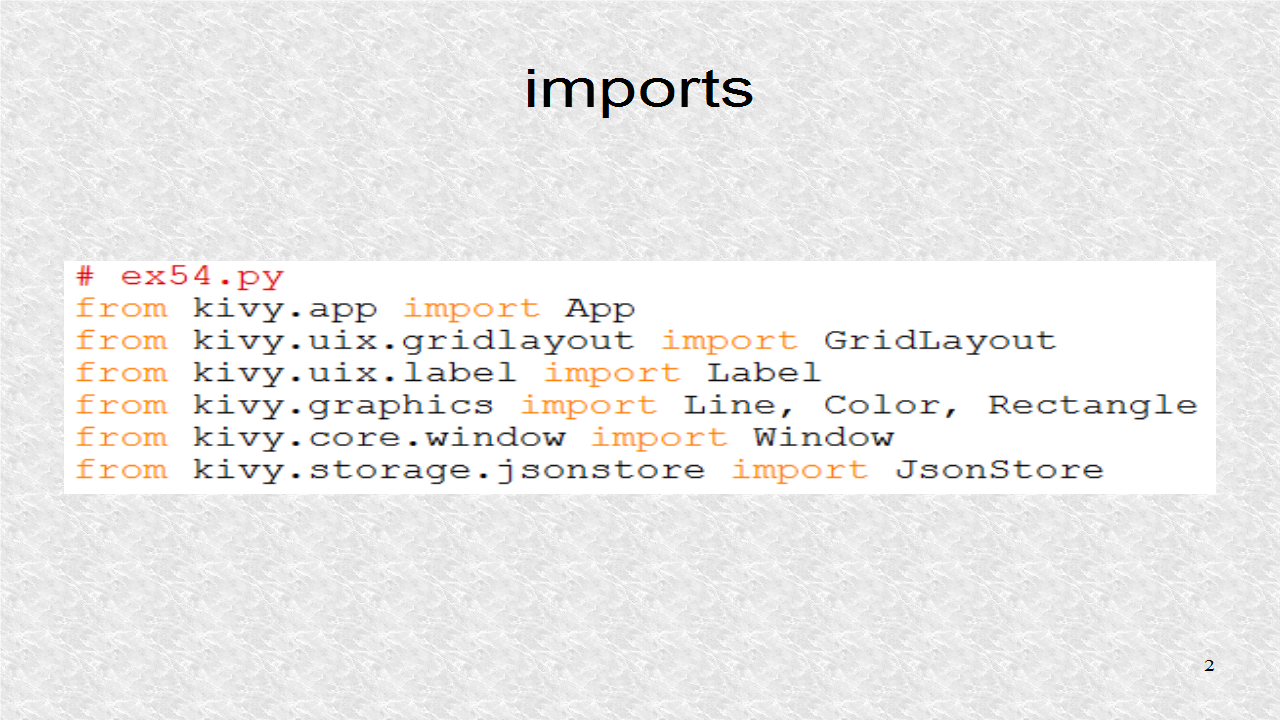
The imports include the App to create an app, and the GridLayout for the root. Each of the grids will be a Label. We need a few graphics classes. The Window is used to find the size of screen. Finally, JsonStore is needed for saving and reading of data, from the json file.


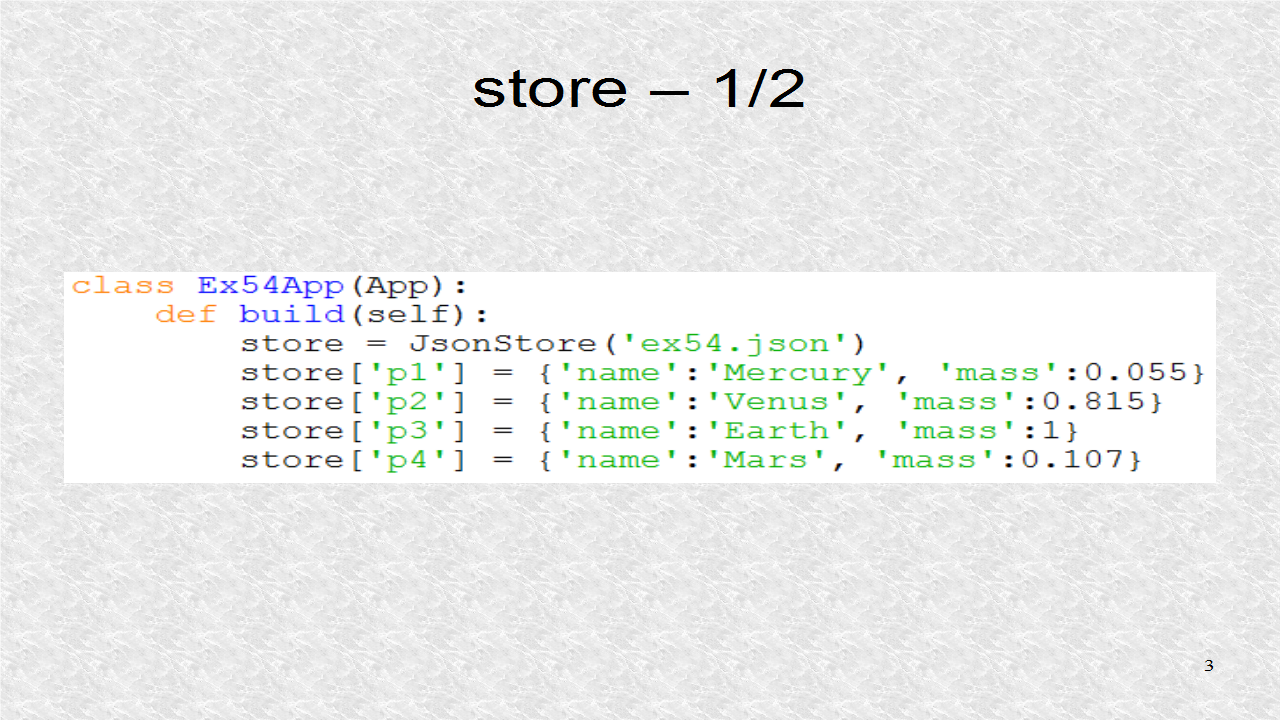
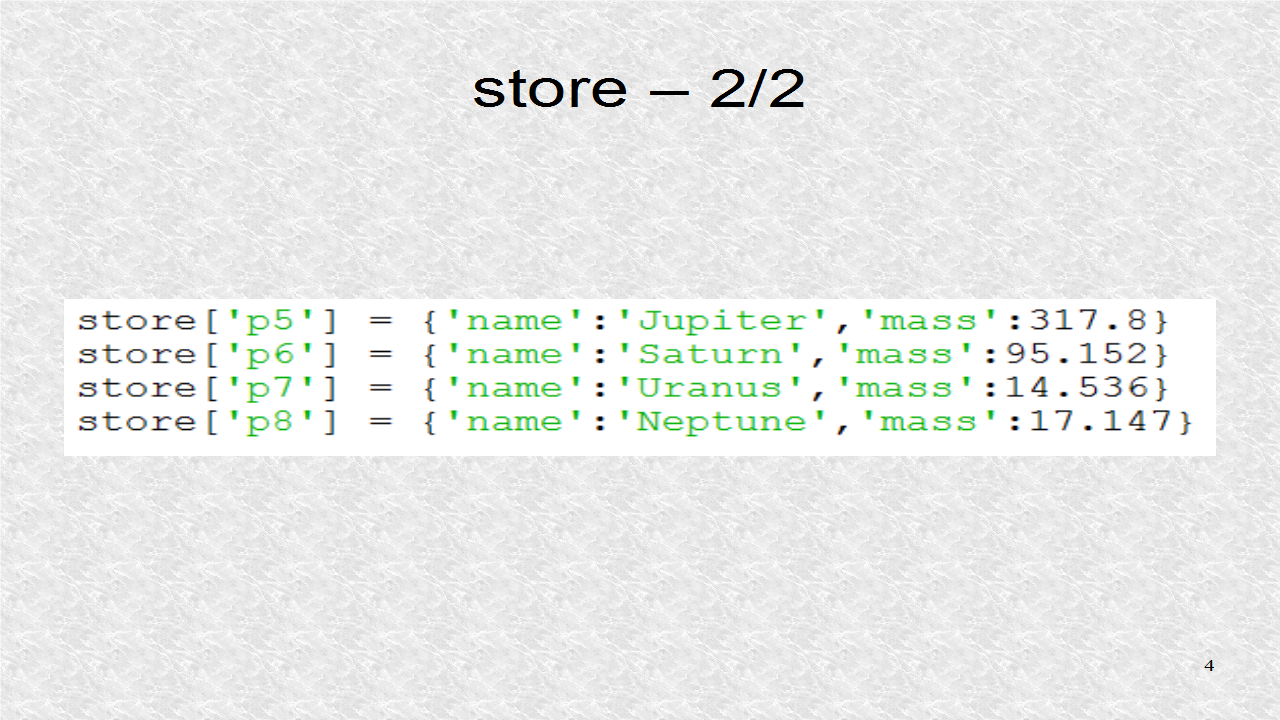
In the build() of the app, we create a store variable, pointing to the json file. Here, four dictionary elements are written to it.


These are the last four elements which are saved to json file.


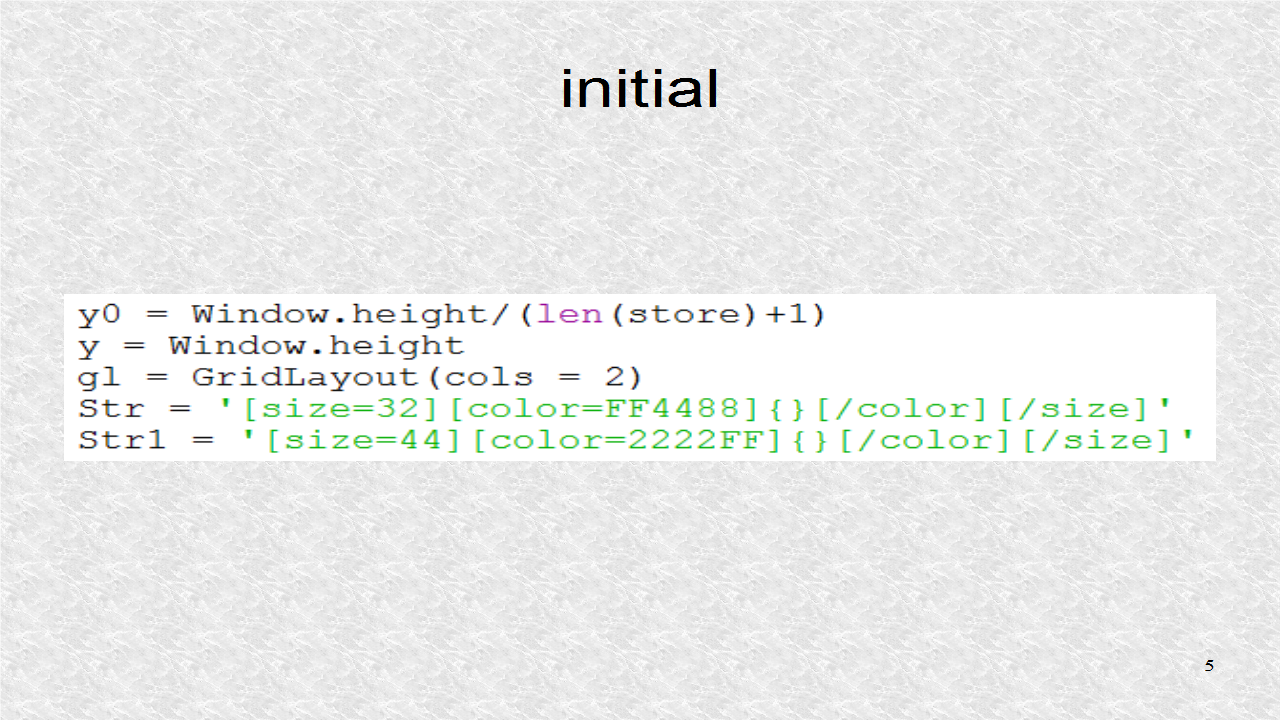
The variable y0, indicates the y-separation of horizontal lines. There will be 9 such lines separating the rows of the grid. The variable y, initially, points to top of the screen. It is moved down by y0 each time a new horizontal line is drawn. The root is a GridLayout with 2 columns. Str and Str1 are templates, for header and non-header labels.


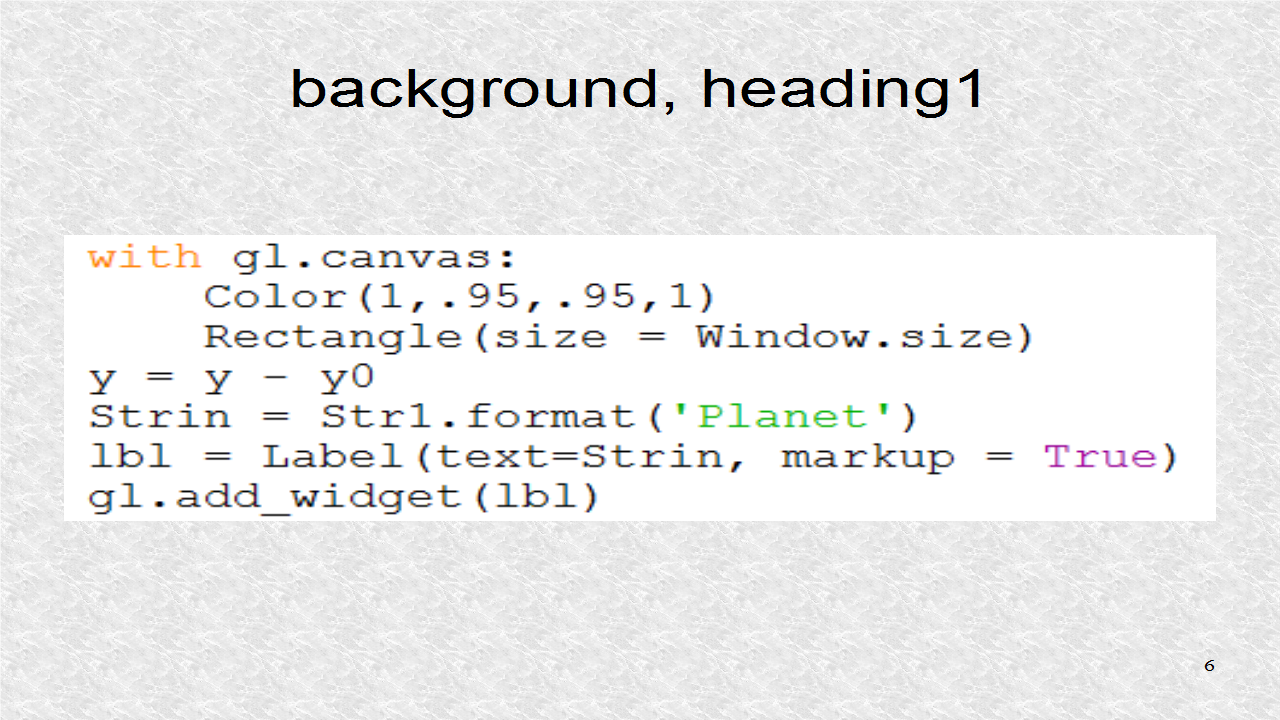
The background color is set. The left header is written.


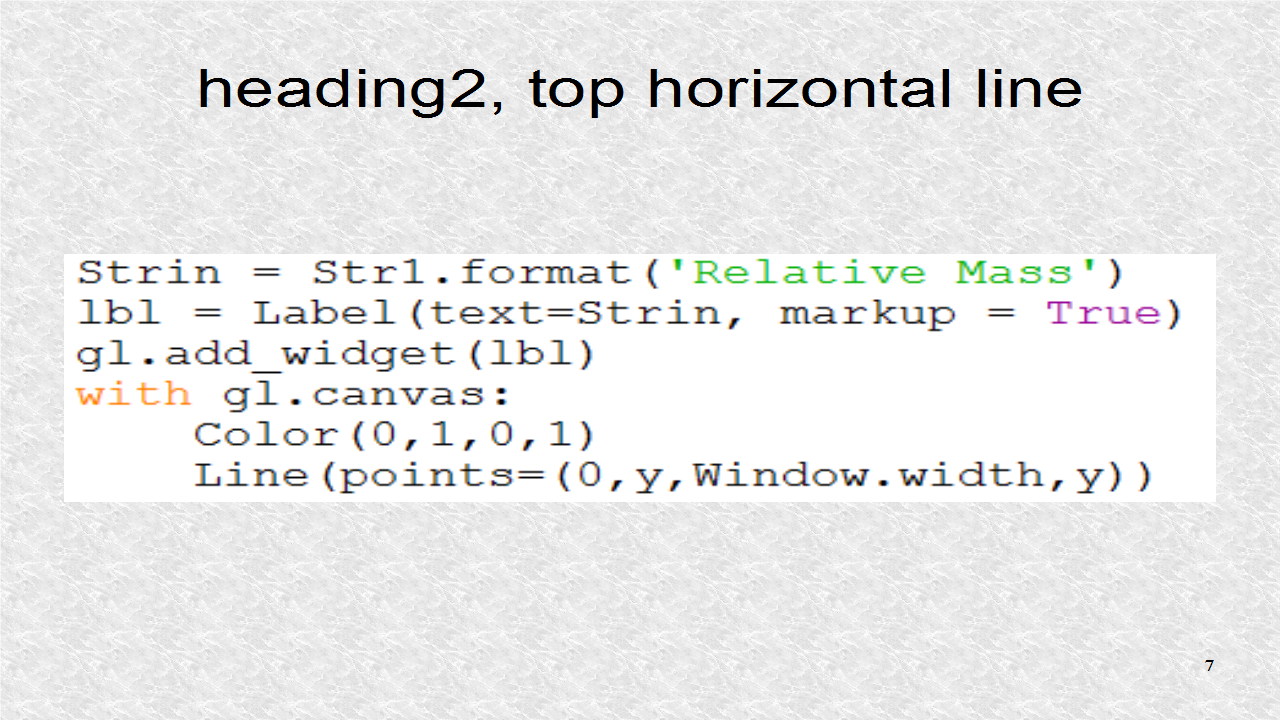
The right header is written, as well as a horizontal line, just below the header labels.


We iterate, over the 8 elements, of the store. Since store is a dictionary structure, that is, a dictionary of dictionaries, it is not sorted. That is why the sorted() function is used. The left-most label is written.


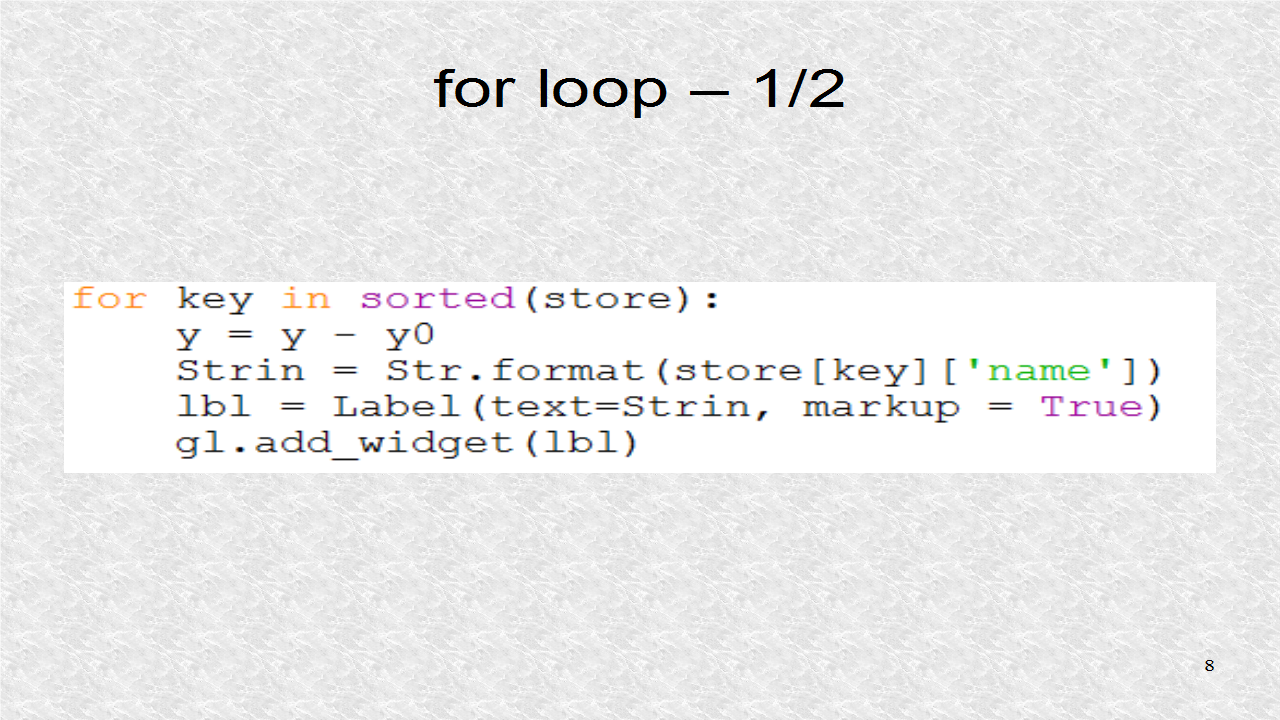
The right label is written, as well as the horizontal line just underneath acting as a divider. Besides this, we have the main code with the run() function.
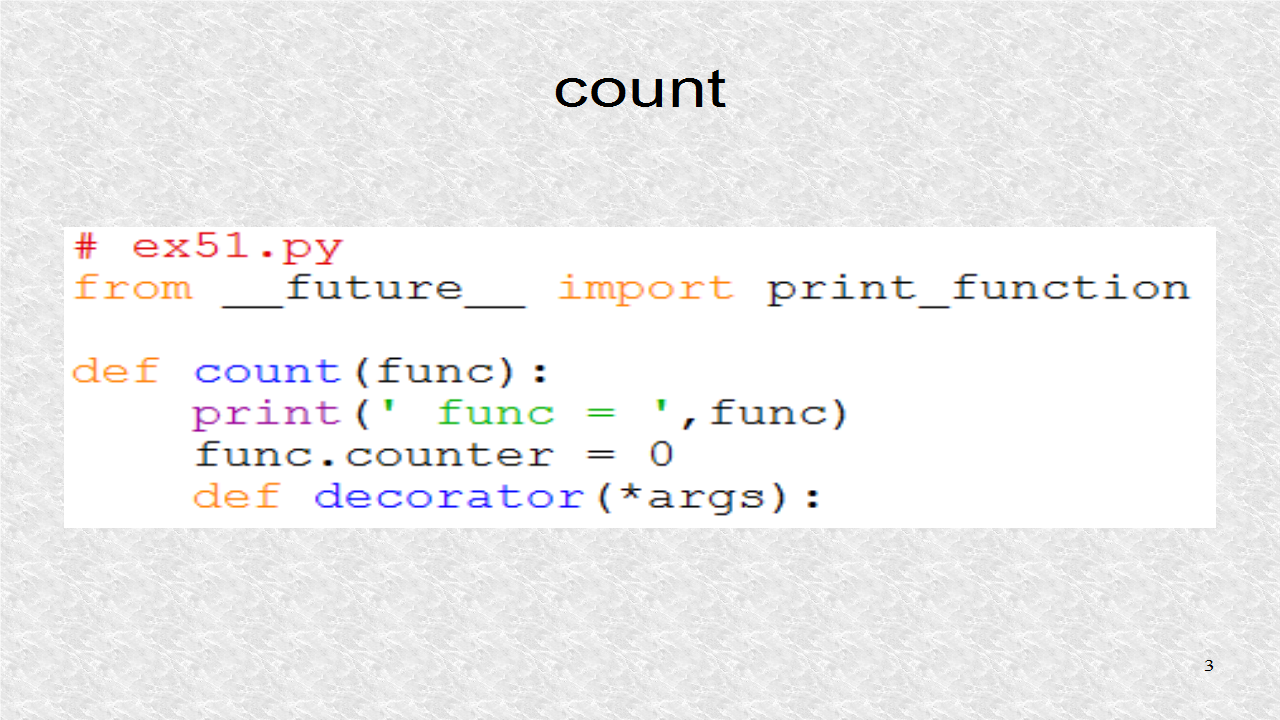

# ex54.py
from kivy.app import App
from kivy.uix.gridlayout import GridLayout
from kivy.uix.label import Label
from kivy.graphics import Line, Color, Rectangle
from kivy.core.window import Window
from kivy.storage.jsonstore import JsonStore

class Ex54App(App):
    def build(self):
        store = JsonStore('ex54.json')
        store['p1'] = {'name':'Mercury', 'mass':0.055}
        store['p2'] = {'name':'Venus', 'mass':0.815}
        store['p3'] = {'name':'Earth', 'mass':1}
        store['p4'] = {'name':'Mars', 'mass':0.107}

        store['p5'] = {'name':'Jupiter','mass':317.8}
        store['p6'] = {'name':'Saturn','mass':95.152}
        store['p7'] = {'name':'Uranus','mass':14.536}
        store['p8'] = {'name':'Neptune','mass':17.147}
              
        y0 = Window.height/(len(store)+1)
        y = Window.height
        gl = GridLayout(cols = 2)
        Str = '[size=32][color=FF4488]{}[/color][/size]'
        Str1 = '[size=44][color=2222FF]{}[/color][/size]'
        with gl.canvas:
            Color(1,.95,.95,1)
            Rectangle(size = Window.size)
        y = y - y0
        Strin = Str1.format('Planet')
        lbl = Label(text=Strin, markup = True)
        gl.add_widget(lbl)
        Strin = Str1.format('Relative Mass')
        lbl = Label(text=Strin, markup = True)
        gl.add_widget(lbl)
        with gl.canvas:
            Color(0,1,0,1)
            Line(points=(0,y,Window.width,y))
        for key in sorted(store):
            y = y - y0
            Strin = Str.format(store[key]['name'])
            lbl = Label(text=Strin, markup = True)
            gl.add_widget(lbl)
            Strin = Str.format(store[key]['mass'])
            lbl = Label(text=Strin, markup = True)
            gl.add_widget(lbl)
            with gl.canvas:
                Color(0,1,0,1)
                Line(points=(0,y,Window.width,y))
        return gl
        
if __name__=='__main__':
    Ex54App().run()


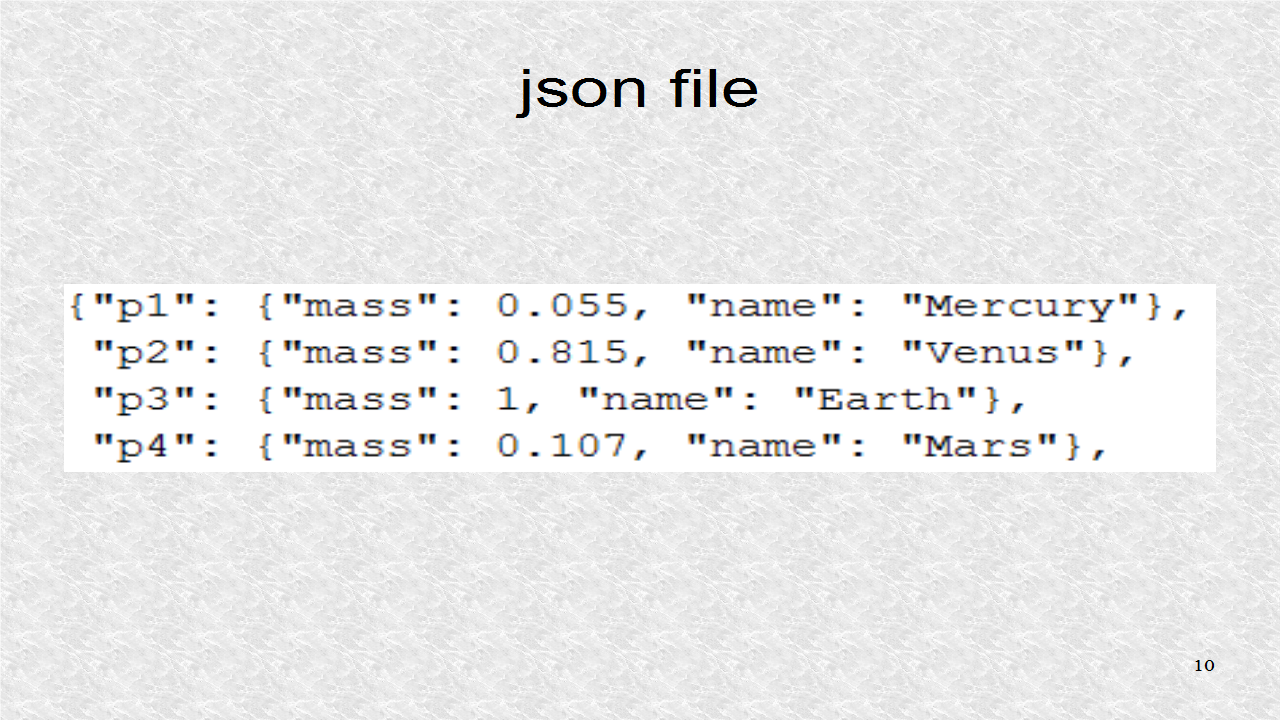
We can always open the json file which is saved to the hard drive on desktop. Here is the first four elements, with newlines manually added for clarity.


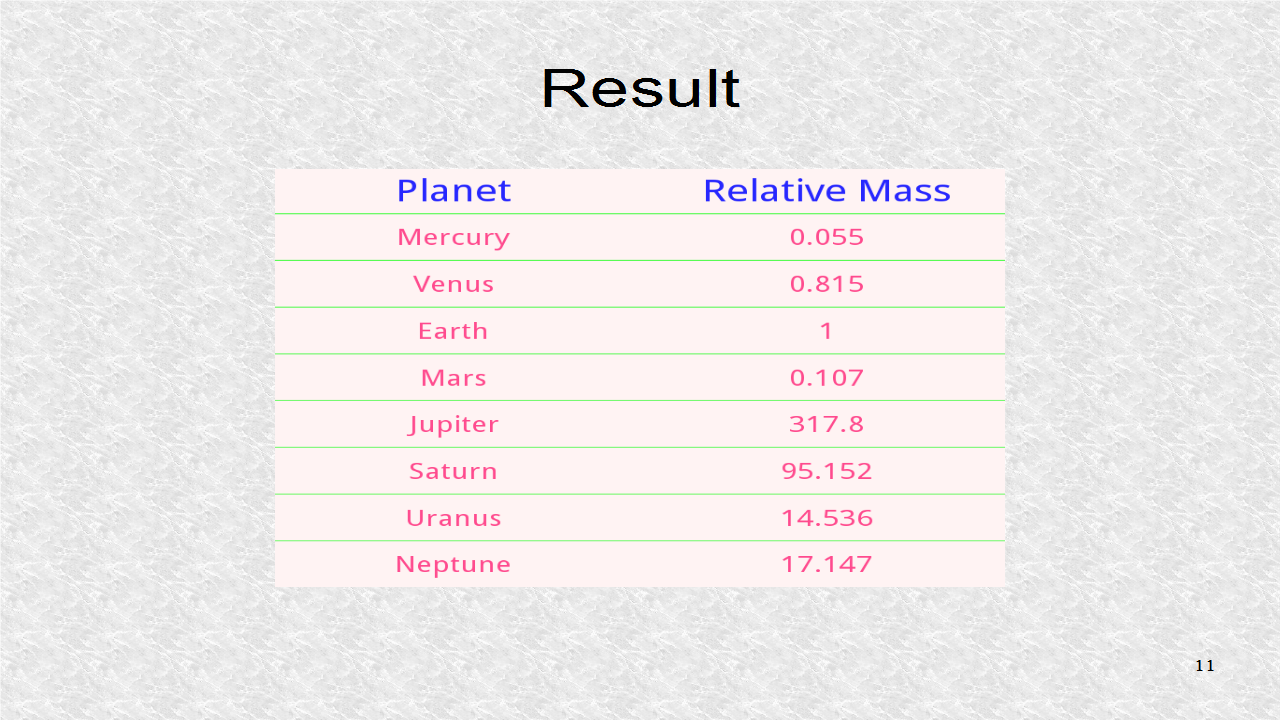
This result shows the header and the 8 rows with the data. The header row and data rows are different colors since they are based on different string templates, with different color and size markup. We can also see the horizontal lines dividing the rows.


Tuesday, July 22, 2014

53. Settings

We can use Kivy settings to set up our setting screens. In almost any Kivy application, pressing F1 will lead to the Kivy setting screen.


To show how to set up your setting screen you have to write a json file, or alternatively, a json variable. We use the later here. A python file ex53json.py is written. It includes one variable in json format. First, there is a heading of Shape. Next there is a Circle selector. There are three other shapes, shown after Slide 3.


Finally, we start a Size section. Its only element is a number called 'pixels'. Finally the entire json variable is turned into a String, using the dumps(), function.


#ex53json.py
import json
A=[
    { "type": "title",
      "title": "Shape"},
    
    { "type": "bool",
      "title": "Circle",
      "key": "circle",
      "section": "shape"},

    { "type": "bool",
      "title": "Square",
      "key": "square",
      "section": "shape"},

    { "type": "bool",
      "title": "Up Triangle",
      "key": "up_triangle",
      "section": "shape"},

    { "type": "bool",
      "title": "Down Triangle",
      "key": "down_triangle",
      "section": "shape"},

    { "type": "title",
      "title": "Size"},

    { "type": "numeric",
      "title": "Pixels",
      "key": "pixels",
      "section": "size",
      "desc": "Size of shapes"}
]
json_data = json.dumps(A)


In the main file, the json python file is imported, in the last line of the import section. Besides App, the graphics Color and Rectangle are imported as we use them in Python code. The root is based on RelativeLayout. The Window is imported to get size of screen. We use a DictProperty to set a Dictionary.


The root is empty in python file. For the app, we first set use_kivy_settings as False so the Kivy setting screen is disabled. You can comment this out, or remove it, if you do want the main Kivy setting screen. Next, a dictionary with 5 elements is set up.


After run() is called, Kivy will execute build_config(). This will set the defaults for the setup screen. Here, it sets the 4 shapes as 1 (ON), and 'pixels' as 50. A text file, .ini file will be created, if it does not already exist.


Shortly afterwards, build() is called. Using the values in the .ini file, we set up the Dictionary.


When we click on the Button, which we will later create in the kv file, or press F1, this function will be executed, unless it is already cached, and in memory. We create a 'Settings' screen, and populate with data from the json file. Then using the canvas.before, we set the color for the setup screen.


Whenever a setting is changed, the on config change is called by Kivy. This will update the dictionary as well as the .ini file.


#ex53.py
from kivy.app import App
from kivy.graphics import Color, Rectangle
from kivy.uix.relativelayout import RelativeLayout
from kivy.core.window import Window
from kivy.properties import DictProperty
from ex53json import json_data
# Uncomment, next 2 lines to remove warning
#from kivy.clock import Clock
#Clock.max_iteration = 15

class Ex53(RelativeLayout):
    pass

class Ex53App(App):
    use_kivy_settings = False
    Val = DictProperty({'circle':0,'square':0,'up_triangle':0,
                        'down_triangle':0,'pixels':0})

    def build_config(self, config):
        config.adddefaultsection('shape')
        for val in ['circle','square','up_triangle','down_triangle']:
            config.setdefault('shape', val, '1')
        config.add_section('size')
        config.setdefault('size', 'pixels', '50')

    def build(self):
        for val in ['circle','square','up_triangle','down_triangle']:
            self.Val[val]=self.config.getint('shape',val)
        self.Val['pixels']=self.config.getint('size','pixels')
        return Ex53()
    
    def build_settings(self, settings):
        settings.add_json_panel('Settings',
                                self.config, data=json_data)
        with settings.canvas.before:
            Color(.2,.25,.25,1)
            Rectangle(pos=(0,0),size=Window.size)
            
    def on_config_change(self, config, section, key, value):
        self.Val[key] = value
        config.set(section,key,value)
        config.write()

if __name__ == '__main__':
    Ex53App().run()


In the kv file, we first set the background color.


The Circle Label is created, which will output the 'circle' dictionary value.


Then, we do the same for Square. Labels are also created for the Up Triangle and the Down Triangle Shapes, shown after Slide 14.


After the 4 shapes, we output a label with 'pixels' value.


We create a button with text of 'Settings (F1)'. If the button is clicked, it manually opens the settings. Note, you will get a warning, as well as the solution, which is included in the source file at blogspot, as comments.


# ex53.kv
<Ex53>:
    canvas:
        Color:
            rgb: .5,0,.5
        Rectangle:
            pos: self.pos
            size: self.size
    Label:
        text: 'Circle: ' + str(app.Val['circle'])
        pos: 0,400
        size_hint: None,None
        size: 100,100
    Label:
        text: 'Square: ' + str(app.Val['square'])
        pos: 150,400
        size_hint: None,None
        size: 100,100
    Label:
        text: 'Up Triangle: ' + str(app.Val['up_triangle'])
        pos: 300,400
        size_hint: None,None
        size: 100,100
    Label:
        text: 'Down Triangle: ' + str(app.Val['down_triangle'])
        pos: 450,400
        size_hint: None,None
        size: 100,100
    Label:
        text: 'Size: ' + str(app.Val['pixels'])
        pos: 200,200
        size_hint: None,None
        size: 100,100
    Button:
        text: 'Settings\n(F1)'
        pos: 200,50
        size_hint: None,None
        size: 100,100
        on_press: app.open_settings()


After opening the Settings, two shapes are selected and pixel is set to 100.


As we can see, the program indicates it has read the values.


Sunday, July 20, 2014

52. Logger

We can use Kivy Logger to log messages. These messages will be displayed, on console, as well as being saved to a file.


This example is based on example 27, on Widgets. The additional imports are for Logger and ctime. ctime is part of the standard python library time module.


This is the first half of the log function which is used as a decorator. It first set's the counter to zero. This variable is attached to the particular function so there is such a variable for each function decorated. Whenever a decorated function is called, it will call decor() instead or whatever the name of the decorated function is. This function first increments the internal counter.


Next, it outputs some log statements. These logs, are sent to console, as well as a text file. The original function is executed in statement func(*args).


Inside the Ball widget class, the on_touch_down function, called by kivy whenever there is a click, is decorated by the log() function.


In addition, on_touch_move is also used. This will be called by kivy whenever there is dragging motion. There might be many such events in a short time duration. We will see log statements from these events.


# ex52.py - Based on ex27.py

from kivy.uix.widget import Widget
from kivy.app import App
from kivy.logger import Logger
from time import ctime

def log(func):
    func.count=0
    def decor(*args):
        func.count += 1
        Logger.info('count {}: {}'.
                    format(func.__name__,func.count))
        Logger.debug('time: {}'.format(ctime()))
        func(*args)
    return decor


class Ball(Widget):
    
    @log
    def on_touch_down(self, touch):
        self.center=touch.pos

    @log
    def on_touch_move(self, touch):
        self.center=touch.pos
    
class Ex52(Widget):
    pass
       
class Ex52App(App):
    def build(self):
        return Ex52()

if __name__=='__main__':
    Ex52App().run()


This is a partial log file output. The name of the log file is indicated near the top of console output. Usually the file, will be in the logs subfolder, of the .kivy folder, which will usually be hidden on Windows. You might want to search for logs, and then click to open that folder.


# ex52.kv

<Ball>:
    size: 65,60
    canvas:
        Color:
            rgb: .75, 0, 0
        Ellipse:
            pos: self.pos
            size: self.size
    
<Ex52>:
    canvas:
        Color:
            rgb: 0,0,1
        Rectangle:
            size: root.width,root.height
            pos: 0,0
    Label:
        pos: 300,root.top-100
        text:'[size=32][color=8888CC]touch_down, touch_move[/color][/size]'
        markup: True
    Ball:


Saturday, July 19, 2014

51. Python Decorators

Python functions can be decorated with extra code, such as logging and debugging information. They also could be used to validate arguments and run the called function only if certain coditions are met.


In this small program, we can see that a function is treated as a normal parameter in a function call. In function run(), the first argument is function name and the rest of arguments, are packed as a tuple. The run() function returns another function, that is passed to it as the first argument. The arguments in args is unpacked in the function return, calling the other function. After defining, the calc() function, the run() function is executed. The first parameter, is the calc() function and the others are arguments, which will be mapped to the parameter args.


# ex51a.py

def run(f,*args): return f(*args)

def calc(a,b,c): return 2*a+3*b+4*c

A=run(calc,1,2,3)
print(A)


In the main program, the print_function is imported so Python 3 print statements can be used inside Python 2.7. Next, we have a function count(). It will have one argument, a function name. We print the function in the next statement. Next a variable counter is set to zero. This variable is attached to the particular function, so there are separate counters for each function. These outer lines will be only done once, per decorated function, as we will see later. Next we have a function called decorator. If we want, we could choose another name. In the decorator function, all arguments are packed into a tuple args. This is the function, which replaces the original one.


Inside the function, we first increment the counter attached to a particular function. The reason this is done is because this particular function is called each time a function is executed. We print the name of the function, as well as its current counter value. The tuple in args is printed. Then we execute the function and return it.


The way to decorate any function is to write the @ symbol, in the line above the function to be decorated. Now, whenever we call calc1() or calc2(), we will call the decorated function and not the function directly.


The function calc3() and calc4() are also decorated. In calc4(), we only have 2 parameters. The other 3 calc() functions have 3 parameters. The outer function in count is done at function definitions when the counters should are set to 0 for all these 4 functions.


We then use calc1(), calc2() and calc3(). In the first call we set the value returned to variable named a. However in the next few lines, the functions are called without storing them. The important thing is that the counter attached to calc1(), calc2(), and calc3() will be 2 as each function is called twice.


The function calc4() is called a total of four times. Finally, the value in variable a is printed.


# ex51.py
from __future__ import print_function

def count(func):
    print(' func = ',func)
    func.counter = 0
    def decorator(*args):
        func.counter += 1
        print(' counter of {} = {}'.
              format(func.__name__,func.counter))
        print('\t args =',args)
        ret = func(*args)
        print('\t Result =',ret)
        return ret
    return decorator

@count
def calc1(a,b,c):
    return 2*a+3*b+4*c

@count
def calc2(a,b,c):
    return 3*a+4*b+5*c

@count
def calc3(a,b,c):
    return 4*a+5*b+6*c

@count
def calc4(a,b):
    return 9*a+10*b

a=calc1(1,2,3)
calc2(1,2,3)
calc3(1,2,3)
calc1(2,3,4)
calc2(2,3,4)
calc3(2,3,4)
calc4(1,2)
calc4(2,3)
for i in range(2):
    calc4(i,i+1)
print(' Value of a is ',a)


The first 4 printouts correspond to the outer function. The rest of the printouts correspond to the inner decorator() function. The counter of calc1(), becomes 1, after the first calc1(), is done.


These correspond to to calc4() calculations from the for loop. The loop ranges from i = 0 to i = 1. We can see the final value of counter in calc4 is 4. We do not have to use decorators. We can redefine functions, by wrapping one function inside another, as shown below.


# ex51b.py
from __future__ import print_function

def count(func):
    print(' func = ',func)
    func.counter = 0
    def decorator(*args):
        func.counter += 1
        print(' counter of {} = {}'.
              format(func.__name__,func.counter))
        print('\t args =',args)
        ret = func(*args)
        print('\t Result =',ret)
        return ret
    return decorator

def calc1(a,b,c):
    return 2*a+3*b+4*c

def calc2(a,b,c):
    return 3*a+4*b+5*c

def calc3(a,b,c):
    return 4*a+5*b+6*c

def calc4(a,b):
    return 9*a+10*b

# Function decorations
calc1 = count(calc1)
calc2 = count(calc2)
calc3 = count(calc3)
calc4 = count(calc4)

a=calc1(1,2,3)
calc2(1,2,3)
calc3(1,2,3)
calc1(2,3,4)
calc2(2,3,4)
calc3(2,3,4)
calc4(1,2)
calc4(2,3)
for i in range(2):
    calc4(i,i+1)
print(' Value of a is ',a)


Wednesday, July 16, 2014

50. Argument Packing and Unpacking

Argument packing, and unpacking, is common in Python and especially, in Kivy.


The print function is imported from __future__ module for Python 3 compatibility. A function calc1() has 3 arguments.


The function calc2() and calc3() are almost identical. Because of the * symbol, args will pack the arguments it receives into a tuple. In calc2(), we use the individual elements to define the local variables a, b, and c. In calc3(), we use unpacking of args to three local variables.


In the main code, the same arguments are used for calc1(), calc2(), and calc3(). The results are placed in val1, val2, and val3. We know they should be the same.


If we have a list, or tuple with the parameters, the * symbol may be used to unpack – that is, if we have a 3-length list, it becomes 3 variables. If we did not use a * symbol, Python would have complained about not finding 3 arguments.


# ex50.py

from __future__ import print_function

def calc1(a,b,c):
    return 2*a+3*b+4*c

def calc2(*args):
    a = args[0]
    b = args[1]
    c = args[2]
    return 2*a+3*b+4*c

def calc3(*args):
    a,b,c = args
    return 2*a+3*b+4*c

def on_touch_down(self,*args):
    touch,res = args
    print(touch)
    print(res)

    
if __name__=='__main__':
    val1 = calc1(1,2,3)
    print('val1 =',val1)
    val2 = calc2(1,2,3)
    print('val2 =',val2)
    val3 = calc3(1,2,3)
    print('val3 =',val3)
    in1 = 1,2,3
    val4 = calc1(*in1)
    print('val4 =',val4)
    on_touch_down(1,1)


The result shows that val1 to val4 are equal, with a value of 20. For parameters with names, we can also have dictionary packing and unpacking.


We can always use *args, in function definitions. For example, for on_touch_down we can use *args to convert the argument into a tuple. However, that tuple will only have one element. *args is usually used if you have many arguments, or even if you have a variable number of arguments.