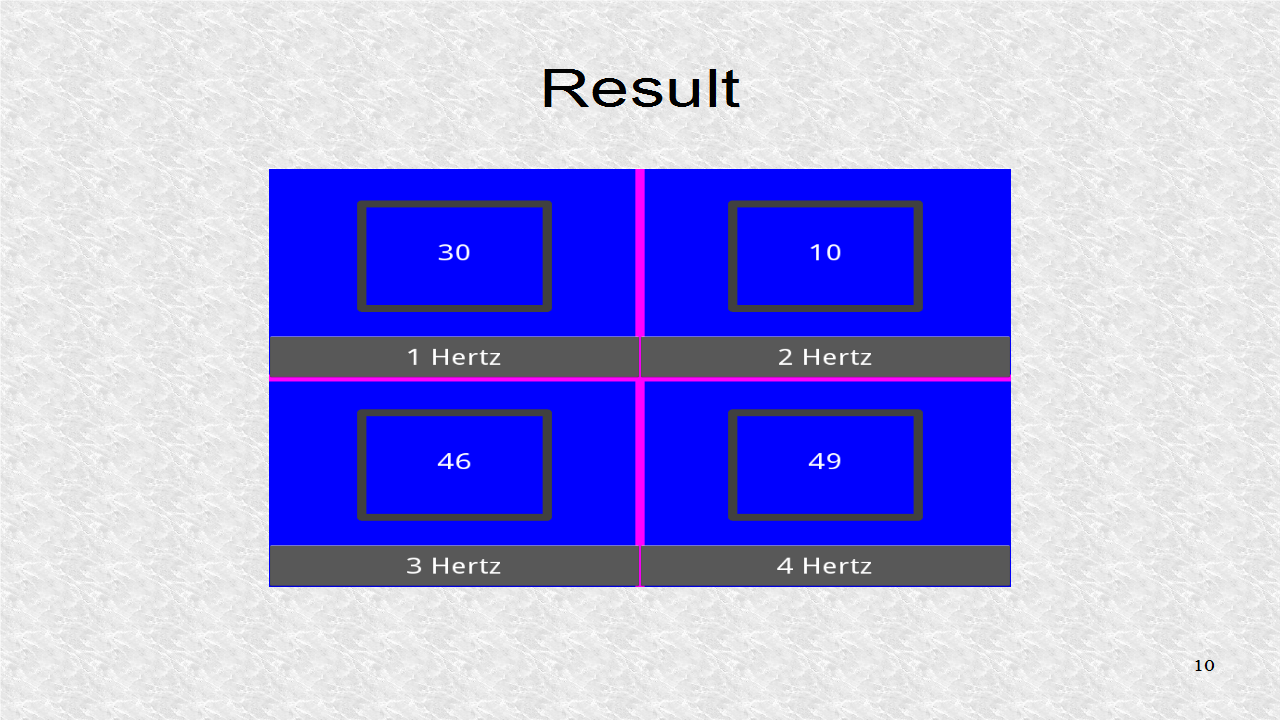
The Clock class will be used to build four counters, each working at a different rate.

We import division from the __future__ module so Python 2.7 can also run this program. The layout is a GridLayout. There are four counters, each with its own NumericProperty. The Clock class is imported so we can have periodic functions.

The root class has four counter variables. These are updated in the four functions, which are called at different rates.

In the app class, we set the four rates as 1 Hz, 2 Hz, 3 Hz and 4 Hz.

# ex28.py

from __future__ import division
from kivy.uix.gridlayout import GridLayout
from kivy.app import App
from kivy.properties import NumericProperty
from kivy.clock import Clock

class Ex28(GridLayout):
    counter1 = NumericProperty(0)
    counter2 = NumericProperty(0)
    counter3 = NumericProperty(0)
    counter4 = NumericProperty(0)
    def update1(self, dt): self.counter1 += 1
    def update2(self, dt): self.counter2 += 1
    def update3(self, dt): self.counter3 += 1
    def update4(self, dt): self.counter4 += 1

class Ex28App(App):
    def build(self):
        ex28=Ex28()
        Clock.schedule_interval(ex28.update1, 1)
        Clock.schedule_interval(ex28.update2, 1/2)
        Clock.schedule_interval(ex28.update3, 1/3)
        Clock.schedule_interval(ex28.update4, 1/4)
        return ex28

if __name__=='__main__':
    Ex28App().run()
In the kv file, we set the background as blue. The columns are defined to be two. We will have 8 widgets in total. This would require 4 rows.

Next horizontal and vertical lines are drawn, dividing the screen into four equal parts.

This creates 4 Borders around each counter. The borders are all 200 by 150 pixels in size. We use the Line command as we do not want a filled rectangle.

There are two labels in 1st row and there are 2 buttons in 2nd row. The first row shows the values of counter 1 and counter 2. The text of the button indicates the rate of the counter, and when the button is clicked, we reset the respective counter.

We do the same in Rows 3 and 4 but this time with counter 3 and counter 4.

# ex28.kv

<Ex28>:
    cols: 2
    canvas:
        Color:
            rgb: 0,0,1
        Rectangle:
            size: root.width,root.height
            pos: 0,0
        Color:
            rgb: 1, 0, 1
        Line:
            points: 0,root.height/2, root.width,root.height/2
            width: 5
        Line:
            points: root.width/2,0, root.width/2,root.height
            width: 5
        Color:
            rgb: .25, .25, .25
        Line:
            rectangle: 100,100, 200,150
            width: 5
        Line:
            rectangle: root.width/2+100,100, 200,150
            width: 5
        Line:
            rectangle: 100,root.height/2+100, 200,150
            width: 5
        Line:
            rectangle: root.width/2+100,root.height/2+100, 200,150
            width: 5
    Label:
        size_hint_y: .8
        text: '[size=32]'+str(root.counter1)+'[/size]'
        markup: True
    Label:
        size_hint_y: .8
        text: '[size=32]'+str(root.counter2)+'[/size]'
        markup: True
    Button:
        size_hint_y: .2
        text: '[size=32]1 Hertz[/size]'
        markup: True
        on_press: root.counter1=0
    Button:
        size_hint_y: .2
        text: '[size=32]2 Hertz[/size]'
        markup: True
        on_press: root.counter2=0
    Label:
        size_hint_y: .8
        text: '[size=32]'+str(root.counter3)+'[/size]'
        markup: True
    Label:
        size_hint_y: .8
        text: '[size=32]'+str(root.counter4)+'[/size]'
        markup: True
    Button:
        size_hint_y: .2
        text: '[size=32]3 Hertz[/size]'
        markup: True
        on_press: root.counter3=0
    Button:
        size_hint_y: .2
        text: '[size=32]4 Hertz[/size]'
        markup: True
        on_press: root.counter4=0
This is the result after clicking to reset the 2nd, 3rd and 4th counter. For example if counter 4 had not been reset it would be around 120, 4 times the value of first counter.

Now day, everything is going to find a new but well settled and successful stream for their career. When I came to this blog, I really impressed by all the knowledge points mentioned here. Thank you for this assistance. นาฬิกา ข้อ มือ
ReplyDeletePython:
ReplyDeleteGood Post! Thank you so much for sharing this pretty post, it was so good to read and useful to improve my knowledge as updated one, keep blogging.
https://www.emexotechnologies.com/online-courses/python-training-in-electronic-city/
Good Post! Thank you so much for sharing this pretty post, it was so good to read and useful to improve my knowledge as updated one, keep blogging.
ReplyDeletePython Training in electronic city