Monday, June 2, 2014

12. FloatLayout


FloatLayout is very similar to RelativeLayout, except, if position is given, it is relative to the root window.


Thus in FloatLayout, you are not confined to the layout, but can have children anywhere in the window. Thus, position of 0,0 always refers to lower-left corner.


The Python program uses GridLayout for the root widget which is defined in the kv file.


# ex12.py

from kivy.uix.gridlayout import GridLayout
from kivy.app import App

class Ex12(GridLayout):
    pass
   
class Ex12App(App):
    def build(self):
        return Ex12()

if __name__=='__main__':
    Ex12App().run()


In the first part of the kv file, a new class is created. MyButton is based on the Button class, but has a size of 100 pixels by 100 pixels.


There are 2 columns in the Grid Layout. Since we will have 2 children, both will take half of the space horizontally, as their size is not explicitly set. Alternatively, we can have used BoxLayout and obtained the same results. For the root widget, we define canvas instructions so the first half of the window is green, and the next half is blue. Note, root.size contains x and y components corresponding to the root window.


Here the two childs are defined. The first is RelativeLayout, with a button 'B1' at 0,0. This is the lower-left corner of the layout as well as the root window. The next child is FloatLayout, and buttons 'B2a' and 'B2b' are defined. The button 'B2a', is just next to 'B1', and 'B2b' is just near the half-way point in x-direction and 100 pixels up in the y-direction.


# ex12.kv

<MyButton@Button>:
    size_hint: None, None
    size: 100, 100
  
<Ex12>:
    cols: 2
    canvas:
        Color:
            rgb: 0,1,0
        Rectangle:
            pos: 0,0
            size: root.size[0]/2,root.size[1]
        Color:
            rgb: 0,0,1
        Rectangle:
            pos: root.size[0]/2,0
            size: root.size[0]/2,root.size[1]
    FloatLayout:
        MyButton:
            text: 'B1'
            pos: 0,0
    RelativeLayout:
        MyButton:
            text: 'B2a'
            pos: 100,0
        MyButton:
            text: 'B2b'
            pos: root.size[0]/2-100,100


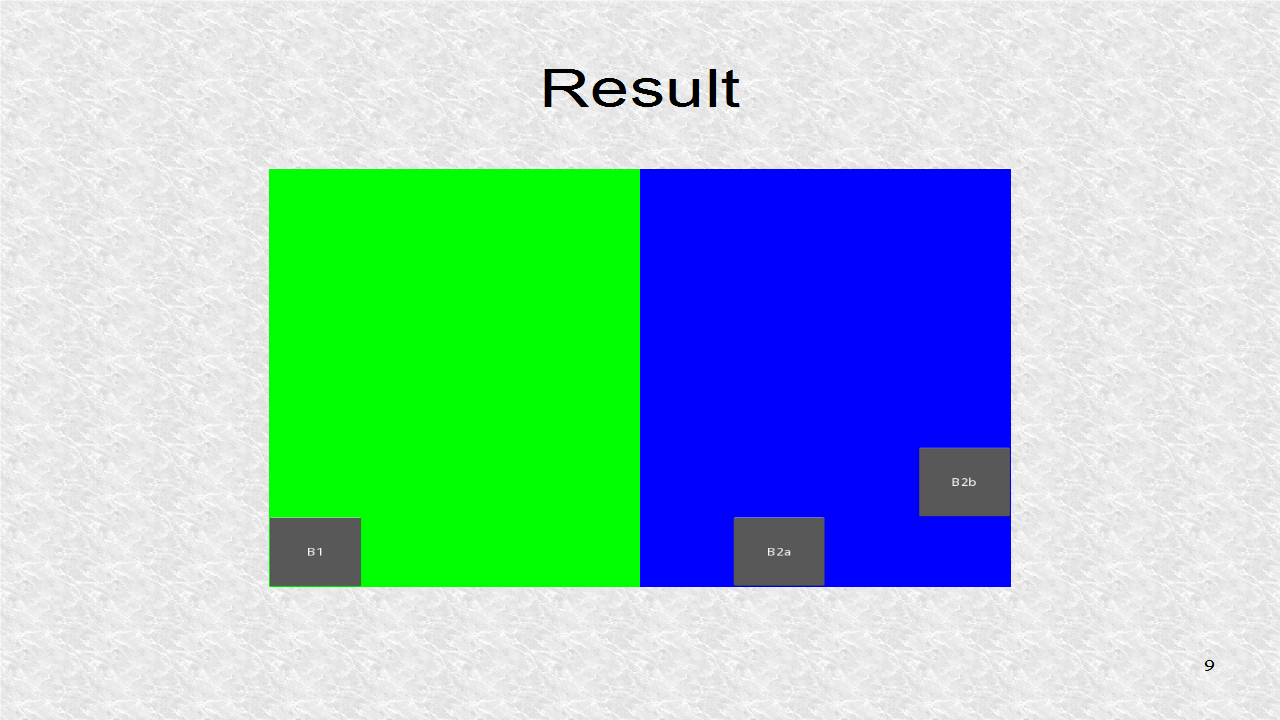
This is the result of the layout. We see that 'B2a' and 'B2b' are not actually inside the Float Layout.


The kv file is changed so FloatLayout is first and RelativeLayout is second. Since 'B2a' and 'B2b' coordinates are now relative, the positions are inside the second half.


With this result, we can see the buttons 'B2a' and 'B2b' are now in the second layout.


Sunday, June 1, 2014

11. RelativeLayout

In RelativeLayout, the size and position of each child widget has to be given.


You can give size_hint and pos_hint for each child widget. In that case, the numbers are relative to the layout. Also it does not make any difference if RelativeLayout or FloatLayout was used, if pos_hint is used to set the position.


The Python program uses RelativeLayout for the root widget which is defined in the kv file.


# ex11.py

from kivy.uix.relativelayout import RelativeLayout
from kivy.app import App

class Ex11(RelativeLayout):
    pass
   
class Ex11App(App):
    def build(self):
        return Ex11()

if __name__=='__main__':
    Ex11App().run()


In the first part of the kv file, a new class is created. MyButton is based on the Button class, but has a size_hint of .2 in the x-direction and .2 in the y-direction. This means the buttons, based on this class, are 20% of the layout in each direction. Because the number of pixels might be different in x and y, the aspect ratio is retained.


For the root widget, we define canvas instructions so we can color a portion of the root. For the pos and size, we use List Comprehensions. The variable self.size refers to the size of self, which is the root in this case. It has two components, one for the x-direction and one for the y-direction like 800 by 600. The position is scaled at 20% and size is scaled at 60% of Layout size. The reason the numbers are given this way is because, now, the colored rectangle just touches the perimeter of the buttons in the four corners.


The first 2 buttons are created with text 'B1' and 'B2'. They are positioned at lower-left corner and lower-right corner.


Next, the buttons with text 'B3', 'B4', and 'B5' are created. B3 is in center of layout, B4 is at the top-left corner and B5 is at the top-right corner.


# ex11.kv

<MyButton@Button>:
    size_hint: .2,.2
        
<Ex11>:
    canvas:
        Color:
            rgb: 0,1,1
        Rectangle:
            pos: [0.2*coord for coord in self.size]
            size: [0.6*coord for coord in self.size]
    MyButton:
        text: 'B1'
        pos_hint: {'x':0,'y':0}
    MyButton:
        text: 'B2'
        pos_hint: {'right':1,'y':0}
    MyButton:
        text: 'B3'
        pos_hint: {'center_x':.5,'center_y':.5}
    MyButton:
        text: 'B4'
        pos_hint: {'x':0, 'top':1}
    MyButton:
        text: 'B5'
        pos_hint: {'right':1, 'top':1}


This is the result, with the colored portion going from 20% to 80% in either of the 2 directions. The button B3 covers up the exact center of the Layout. The other buttons are at the four corners.